
Endodontic file color coding is an ISO-based identification system that helps dental professionals quickly recognize the nominal tip size of root canal instruments. Standard ISO colors correspond to specific file diameters, making it easier to select, sequence, organize, and communicate the correct endodontic files during root canal treatment.
Endodontic File Color Coding Chart: Quick Reference
The easiest way to identify a standard endodontic hand file is to remember the core sequence:
Pink → Grey → Purple → White → Yellow → Red → Blue → Green → Black
The colors correspond to increasing ISO file sizes.
| ISO File Size | Tip Diameter D1 | Standard Color | Common Identification |
|---|---|---|---|
| #06 | 0.06 mm | Pink | Extra-small hand file |
| #08 | 0.08 mm | Grey | Small hand file |
| #10 | 0.10 mm | Purple | Small hand file / glide-path instrument |
| #15 | 0.15 mm | White | Standard initial enlargement |
| #20 | 0.20 mm | Yellow | Small-to-medium preparation |
| #25 | 0.25 mm | Red | Common apical preparation size |
| #30 | 0.30 mm | Blue | Medium preparation |
| #35 | 0.35 mm | Green | Medium-to-large preparation |
| #40 | 0.40 mm | Black | Larger preparation |
| #45 | 0.45 mm | White | Color sequence repeats |
| #50 | 0.50 mm | Yellow | Larger preparation |
| #55 | 0.55 mm | Red | Larger preparation |
| #60 | 0.60 mm | Blue | Larger preparation |
| #70 | 0.70 mm | Green | Large preparation |
| #80 | 0.80 mm | Black | Large preparation |
| #90 | 0.90 mm | White | Color sequence repeats |
| #100 | 1.00 mm | Yellow | Large-size instrument |
| #110 | 1.10 mm | Red | Large-size instrument |
| #120 | 1.20 mm | Blue | Large-size instrument |
| #130 | 1.30 mm | Green | Large-size instrument |
| #140 | 1.40 mm | Black | Large-size instrument |
Important: ISO color coding identifies standardized instrument size; it does not, by itself, identify the file’s taper, cross-sectional design, metallurgy, motion, or clinical application. ISO 3630-1 covers general requirements, size designations, color coding, packaging, and identification for endodontic instruments.
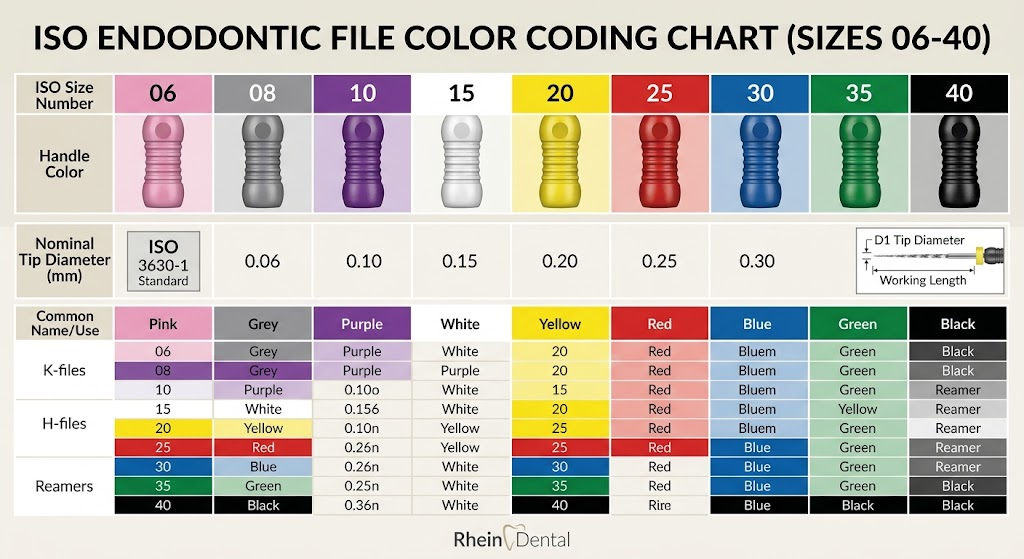
What Is ISO Color Coding in Endodontics?
ISO color coding is a standardized visual system used to identify endodontic instrument sizes.
The number assigned to an ISO file represents its nominal tip diameter in hundredths of a millimeter.
For example:
- ISO #10 = 0.10 mm tip diameter
- ISO #15 = 0.15 mm
- ISO #20 = 0.20 mm
- ISO #25 = 0.25 mm
- ISO #30 = 0.30 mm
- ISO #40 = 0.40 mm
Therefore, a larger ISO number generally means a larger instrument tip.
The system is particularly useful when several files are being used sequentially during root canal preparation. Instead of reading every number on a small instrument handle, clinicians and dental assistants can often identify the file size immediately from its color.
ISO 3630-1:2019 specifically includes general size designations and color coding for endodontic instruments. As of 2026, ISO lists a new edition, ISO/DIS 3630-1, as under development to replace the 2019 edition.
How to Read an Endodontic File Size
Understanding the relationship between ISO number, tip diameter, taper, and working length is essential.
ISO size
The ISO size represents the nominal diameter of the file tip.
For example:
ISO #25 = 0.25 mm tip diameter
Taper
Taper describes how quickly the instrument increases in diameter from its tip toward the shaft.
A conventional .02 taper increases approximately 0.02 mm in diameter for each millimeter from the tip.
For a theoretical ISO #25 instrument with a .02 taper:
- D1 = 0.25 mm
- Approximately 1 mm from the tip = 0.27 mm
- Approximately 2 mm = 0.29 mm
- Approximately 16 mm = 0.57 mm
This distinction matters because two files can have the same ISO tip size but different tapers.
For example:
- #25/.02
- #25/.04
- #25/.06
All have a nominal 0.25 mm tip, but they increase in diameter at different rates.
Practical rule
ISO size tells you the tip diameter. Taper tells you how quickly the file becomes wider along its working part.
Complete Endodontic File Color Sequence
The standard color sequence becomes much easier to remember when divided into groups.
Small ISO Sizes
| Size | Color | Tip Diameter |
| #06 | Pink | 0.06 mm |
| #08 | Grey | 0.08 mm |
| #10 | Purple | 0.10 mm |
These smaller instruments are particularly useful when negotiating narrow canals and establishing an initial pathway.
Small stainless-steel hand files remain important for initial canal exploration. Contemporary endodontic guidance continues to emphasize establishing a reproducible glide path before using many engine-driven NiTi instruments.
Standard ISO Sequence
The most frequently memorized sequence is:
| Size | Color | Diameter |
| #15 | White | 0.15 mm |
| #20 | Yellow | 0.20 mm |
| #25 | Red | 0.25 mm |
| #30 | Blue | 0.30 mm |
| #35 | Green | 0.35 mm |
| #40 | Black | 0.40 mm |
Easy memory trick
White → Yellow → Red → Blue → Green → Black
Think:
15 → 20 → 25 → 30 → 35 → 40
The pattern then repeats:
White → Yellow → Red → Blue → Green → Black
So:
- 45 = White
- 50 = Yellow
- 55 = Red
- 60 = Blue
- 70 = Green
- 80 = Black
This repeating color system is one of the most useful features of standardized endodontic instrument identification.
Why Are Endodontic Files Color Coded?
Color coding provides several practical advantages in the dental operatory.
1. Faster instrument identification
Small endodontic files can be difficult to read during treatment. Color coding provides an immediate visual reference.
2. Easier file sequencing
When files are used progressively, the color sequence helps clinicians and assistants recognize the next size.
3. Better tray organization
Organizing files according to ISO color can reduce confusion when multiple instruments are placed on an endodontic tray.
4. Improved communication
A clinician can ask for a “red file” or “#25 file,” giving the dental assistant two easy ways to identify the same standardized size.
5. Reduced selection errors
Visual identification can complement the numerical marking on the handle, particularly when instruments are small.
Endodontic File Sizes and Their Clinical Role
An ISO number does not dictate exactly how a file should be used clinically.
Canal anatomy, working length, curvature, initial canal size, dentin thickness, irrigation strategy, instrumentation system, and the clinician’s treatment protocol all influence file selection.
Nevertheless, the following table provides a useful general framework.
| File Size | Typical Role | General Consideration |
| #06 | Initial negotiation | Very narrow canals |
| #08 | Canal negotiation | Narrow or constricted canals |
| #10 | Glide-path development | Establishing a reproducible pathway |
| #15 | Initial enlargement | Frequently used during hand instrumentation |
| #20 | Further enlargement | Sequential enlargement |
| #25 | Apical enlargement | Common size in many protocols |
| #30 | Further shaping | Moderate enlargement |
| #35 | Larger preparation | Depends on canal anatomy |
| #40 | Larger preparation | Requires appropriate anatomical assessment |
| #45+ | Large canals | Selected according to clinical requirements |
Clinical caution: These are general instrument-size relationships, not a universal root canal preparation protocol. The final apical size should be determined according to the individual canal anatomy and the clinician’s chosen technique.
Hand Files vs Rotary Files: Does Color Coding Work the Same Way?
Not always.
This is one of the most important distinctions when using an endodontic file color coding chart.
Standard hand files
Conventional ISO-sized hand files commonly follow the standardized color system. K-files and many other standardized hand instruments are therefore relatively easy to identify by size and color.
Rotary and reciprocating NiTi files
Modern engine-driven instruments can use:
- Different tapers
- Proprietary geometries
- Different cross-sections
- Heat-treated NiTi alloys
- Variable tapers
- Variable pitch
- Specialized tip designs
- Proprietary color systems
Consequently, you should not assume that every colored rotary file follows the conventional ISO color sequence.
A blue rotary instrument, for example, does not automatically mean it is an ISO #30 instrument.
Always check the manufacturer’s instructions, packaging, markings, and instrument specifications.
Modern NiTi systems have evolved substantially, with metallurgy, geometry, and kinematics all influencing instrument behavior. The American Association of Endodontists notes that contemporary NiTi instruments provide important flexibility advantages but can still be subject to torsional and cyclic fatigue.
ISO Size vs Taper: What’s the Difference?
This is one of the most common questions among dental students and clinicians.
Consider these examples:
| Instrument | Tip Diameter | Taper | Meaning |
| #20/.02 | 0.20 mm | .02 | Small tip, standard taper |
| #25/.02 | 0.25 mm | .02 | Larger tip, standard taper |
| #25/.04 | 0.25 mm | .04 | Same tip, greater taper |
| #25/.06 | 0.25 mm | .06 | Same tip, still greater taper |
| #30/.04 | 0.30 mm | .04 | Larger tip and .04 taper |
Key takeaway
File size and file taper are not interchangeable terms.
A #25 file is not automatically a .02, .04, or .06 taper. The complete specification must be considered.
What Does D1 Mean on an Endodontic File?
D1 refers to the nominal diameter at the file tip.
For example:
- #20 → D1 = 0.20 mm
- #25 → D1 = 0.25 mm
- #30 → D1 = 0.30 mm
The D1 measurement helps standardize the cutting tip across appropriately standardized instruments.
This is why the ISO number can be directly related to the tip diameter.
What Is the Difference Between #10, #15, #20 and #25 Files?
The difference is primarily the tip diameter.
| File | Tip Diameter | Difference from Previous Size |
| #10 | 0.10 mm | — |
| #15 | 0.15 mm | +0.05 mm |
| #20 | 0.20 mm | +0.05 mm |
| #25 | 0.25 mm | +0.05 mm |
After #10, the commonly encountered standard sequence increases by 0.05 mm through the smaller-to-medium sizes.
This allows gradual enlargement rather than jumping immediately to a substantially larger instrument.
Why Do Colors Repeat After ISO #40?
The ISO system uses a repeating six-color sequence for many standard instrument sizes.
The sequence is:
White → Yellow → Red → Blue → Green → Black
Therefore:
- #15 = White
- #20 = Yellow
- #25 = Red
- #30 = Blue
- #35 = Green
- #40 = Black
- #45 = White
- #50 = Yellow
- #55 = Red
- #60 = Blue
- #70 = Green
- #80 = Black
Because the colors repeat, the color alone is not enough to identify larger instruments.
Always confirm the numerical size.
Endodontic File Color Coding: Quick Chairside Checklist
Before selecting a file, check:
- Confirm the ISO size.
- Confirm the file type.
- Check the taper.
- Confirm the required working length.
- Check whether the instrument is hand, rotary, or reciprocating.
- Inspect the instrument for visible distortion or damage.
- Confirm the manufacturer’s recommended use.
- Use the appropriate sequence for the selected instrumentation system.
- Do not rely on color alone when the color sequence repeats.
Step-by-Step: How to Use an ISO File Color Chart
Step 1: Identify the required file size
Determine the approximate instrument size required for the clinical step.
Step 2: Check the ISO number
Verify the numerical marking rather than relying solely on the color.
Step 3: Match the color
Use the ISO chart to confirm the expected handle color.
Step 4: Check taper
A #25 file could have different tapers, so confirm whether you need .02, .04, .06, or another specification.
Step 5: Check the instrument type
Determine whether the instrument is a K-file, H-file, reamer, NiTi rotary file, reciprocating file, or another design.
Step 6: Follow the manufacturer’s instructions
This is especially important for engine-driven NiTi systems because their operating speed, torque, motion, sequence, and reuse recommendations can vary.
Step 7: Inspect before use
Look for distortion, unwinding, visible defects, or other signs that could compromise the instrument.
Common Mistakes When Reading Endodontic File Colors
Mistake 1: Assuming every red file is #25
For standardized ISO hand instruments, red corresponds to #25, #55, #110, etc., depending on the sequence.
Better approach: Always confirm the number.
Mistake 2: Confusing color with taper
Color generally communicates size within an ISO system, not taper.
Better approach: Read both the size and taper specifications.
Mistake 3: Applying hand-file colors to proprietary rotary systems
Manufacturers may use colors differently on specialized engine-driven instruments.
Better approach: Follow the specific manufacturer’s identification system.
Mistake 4: Jumping between file sizes without a planned sequence
Using files inappropriately can increase mechanical stress and contribute to procedural complications.
The AAE emphasizes sequential instrumentation and recommends establishing an appropriate glide path before using rotary instrumentation in many clinical situations.
Mistake 5: Reusing fatigued instruments
Instrument fatigue is an important consideration, particularly with NiTi instruments.
The AAE reports that instrument fracture can occur through mechanisms including torsional and cyclic fatigue and emphasizes appropriate inspection and instrument-use practices.
Advantages and Limitations of ISO Color Coding
Advantages
- Fast identification: Colors provide an immediate visual reference.
- Standardization: ISO sizing provides a common reference system.
- Efficient organization: Instruments can be arranged by size.
- Better communication: Color and numerical size can be used together.
- Useful for education: Students can learn size relationships more easily.
- Reduced confusion: A consistent sequence supports instrument organization.
Limitations
- Colors repeat: The same color represents multiple larger sizes.
- Not all rotary files follow ISO colors: Proprietary systems may use different conventions.
- Color does not indicate taper: A separate specification is required.
- Color does not identify metallurgy: Stainless steel and NiTi instruments can share the same ISO size/color.
- Color does not determine clinical use: Anatomy and treatment protocol remain critical.
ISO Color Coding vs Modern NiTi File Systems
Endodontic instrumentation has moved considerably beyond conventional stainless-steel hand files.
Modern NiTi instruments can combine:
- Heat-treated alloys
- Advanced cross-sectional geometries
- Variable taper
- Variable pitch
- Continuous rotation
- Reciprocating motion
- Enhanced flexibility
- Different fatigue-resistance characteristics
The AAE describes NiTi as a major development in root canal instrumentation because its flexibility can help instruments negotiate curved anatomy more effectively than conventional stainless-steel instruments. However, NiTi instruments still require appropriate technique because torsional and cyclic fatigue can result in separation.
Therefore, the ISO chart remains highly useful for understanding standardized instrument size, but it should not be treated as a complete guide to modern rotary instrumentation.
Why Glide Path Preparation Matters
Before using many engine-driven instruments, clinicians establish a predictable pathway through the canal.
This is commonly referred to as the glide path.
Small hand files such as #06, #08 and #10 can be valuable during initial canal negotiation, depending on the anatomy and clinical technique.
The AAE’s recent discussion of challenging canal anatomy emphasizes the importance of establishing a smooth, reproducible glide path, particularly in abruptly curved or constricted canals.
A well-managed glide path can help the subsequent instrumentation proceed more predictably.
Practical principle
Do not select a file simply because its color or size looks appropriate. Select it because it is appropriate for the canal anatomy and the instrumentation protocol.
How Should Endodontic Files Be Organized?
A practical endodontic tray can be organized in ascending ISO order:
#06 → #08 → #10 → #15 → #20 → #25 → #30 → #35 → #40
The corresponding colors are:
Pink → Grey → Purple → White → Yellow → Red → Blue → Green → Black
For larger instruments, continue the repeating sequence while keeping the numerical size clearly identifiable.
Organization tips
- Keep small files separated from larger files.
- Arrange hand files in numerical order.
- Store rotary systems according to the manufacturer’s sequence.
- Keep different file systems clearly separated.
- Avoid relying on color alone.
- Inspect instruments before use.
- Follow appropriate cleaning, sterilization, and reuse instructions for reusable instruments.
Endodontic File Color Coding for Dental Students
If you are learning endodontics, memorize the following first:
The essential sequence
#15 — White
#20 — Yellow
#25 — Red
#30 — Blue
#35 — Green
#40 — Black
Then remember:
#45 starts the same color sequence again.
For smaller files:
#06 — Pink
#08 — Grey
#10 — Purple
The easiest memory pattern
Pink, Grey, Purple, White, Yellow, Red, Blue, Green, Black
Once you know this sequence, you can identify a large part of a conventional ISO endodontic file set quickly.
Endodontic File Size Chart for Quick Revision
| Color | Standard ISO Size | Tip Diameter |
| Pink | #06 | 0.06 mm |
| Grey | #08 | 0.08 mm |
| Purple | #10 | 0.10 mm |
| White | #15 | 0.15 mm |
| Yellow | #20 | 0.20 mm |
| Red | #25 | 0.25 mm |
| Blue | #30 | 0.30 mm |
| Green | #35 | 0.35 mm |
| Black | #40 | 0.40 mm |
Memorize this line:
06 Pink → 08 Grey → 10 Purple → 15 White → 20 Yellow → 25 Red → 30 Blue → 35 Green → 40 Black
Key Takeaways
If you only remember five points from this endodontic file color coding chart, remember these:
- ISO file size corresponds to nominal tip diameter.
- #15 is white, #20 yellow, #25 red, #30 blue, #35 green and #40 black.
- #06, #08 and #10 are pink, grey and purple respectively.
- The color sequence repeats after #40, so color alone cannot identify larger files.
- ISO size does not tell you the file’s taper, metallurgy, geometry, motion, or clinical indication.
Expert Tips for Dental Practices
Tip 1: Keep a printed ISO chart nearby
A small reference chart can be particularly useful for dental assistants, students, and practices using multiple instrument systems.
Tip 2: Organize hand files by ISO sequence
A consistent layout makes instrument identification faster and reduces unnecessary searching during treatment.
Tip 3: Separate standardized and proprietary systems
Keep conventional ISO hand files separate from rotary or reciprocating systems with manufacturer-specific sequences.
Tip 4: Check the complete specification
Before using an instrument, verify:
Size + taper + length + instrument type + manufacturer instructions
Tip 5: Treat color as a visual aid—not the final identification
Numerical markings and manufacturer documentation should take priority whenever there is uncertainty.
Why Choose Rhein Dental for Endodontic Instruments?
Reliable endodontic instrumentation begins with consistent manufacturing, accurate sizing, appropriate material selection, and dependable quality control.
Rhein Dental supplies dental instruments designed for professional clinical applications, including endodontic instrumentation and accessories.
For dental professionals, distributors, dental schools, and healthcare procurement teams, the right instrument specification matters just as much as the product category. When sourcing endodontic files, consider the required ISO sizes, working lengths, tapers, materials, packaging, sterilization requirements, and intended clinical application.
Explore Rhein Dental’s dental instrument range, request the latest catalogue, or contact the team to discuss your endodontic instrument requirements.
Frequently Asked Questions About Endodontic File Color Coding
What color is an ISO #10 endodontic file?
An ISO #10 endodontic file is purple under the conventional ISO color-coding sequence.
How should I choose an endodontic file size?
File selection should consider canal anatomy, working length, canal curvature, initial canal dimensions, treatment objectives, instrumentation system, taper, and the manufacturer’s instructions. A color chart is an identification aid, not a substitute for clinical judgment.
Do stainless-steel and NiTi files use the same ISO size system?
Standardized instrument dimensions can be expressed using ISO sizing, but stainless-steel hand files and modern NiTi instruments can differ substantially in metallurgy, geometry, taper, flexibility, motion, and clinical application. Therefore, ISO size alone does not describe the complete instrument.
What is the most commonly memorized ISO file color sequence?
The core sequence is:
White → Yellow → Red → Blue → Green → Black
corresponding to:
#15 → #20 → #25 → #30 → #35 → #40What does the number on an endodontic file mean?
The ISO number represents the instrument’s nominal tip diameter in hundredths of a millimeter. For example, #25 corresponds to a nominal 0.25 mm tip diameter.