
Precision is everything in orthodontics. Even a slight misalignment of an archwire can affect treatment efficiency, patient comfort, and appliance performance. That’s why every orthodontic practice relies on specialized instruments designed to manipulate wires safely and accurately(Archwire Director Tool).
Among these essential instruments, the archwire director tool plays a crucial role in guiding, positioning, and seating orthodontic archwires during treatment(Archwire Director Tool).
Whether you’re an orthodontist, dental student, orthodontic assistant, or purchasing manager looking to understand orthodontic instruments, this comprehensive guide explains everything you need to know about using an archwire director tool properly.
What Is an Archwire Director Tool?
An archwire director tool is a specialized orthodontic instrument designed to help clinicians guide, position, seat, and direct orthodontic archwires into bracket slots without causing unnecessary force or patient discomfort.
Instead of grabbing or squeezing the wire like orthodontic pliers, an archwire director uses a fine working tip that gently pushes or directs the wire into the desired position.
It is especially valuable during:
- Initial wire insertion
- Wire adjustments
- Elastic ligature placement
- Self-ligating bracket procedures
- Finishing and detailing stages
The tool provides exceptional control when working in confined areas of the mouth.
Why Is an Archwire Director Important?
Modern orthodontic treatment depends on precise wire positioning.
Improperly seated archwires may lead to:
- Inefficient tooth movement
- Increased patient discomfort
- Bracket stress
- Wire distortion
- Longer treatment times
Using a dedicated dental archwire director allows clinicians to manipulate wires gently while maintaining the integrity of both the archwire and the orthodontic appliance.
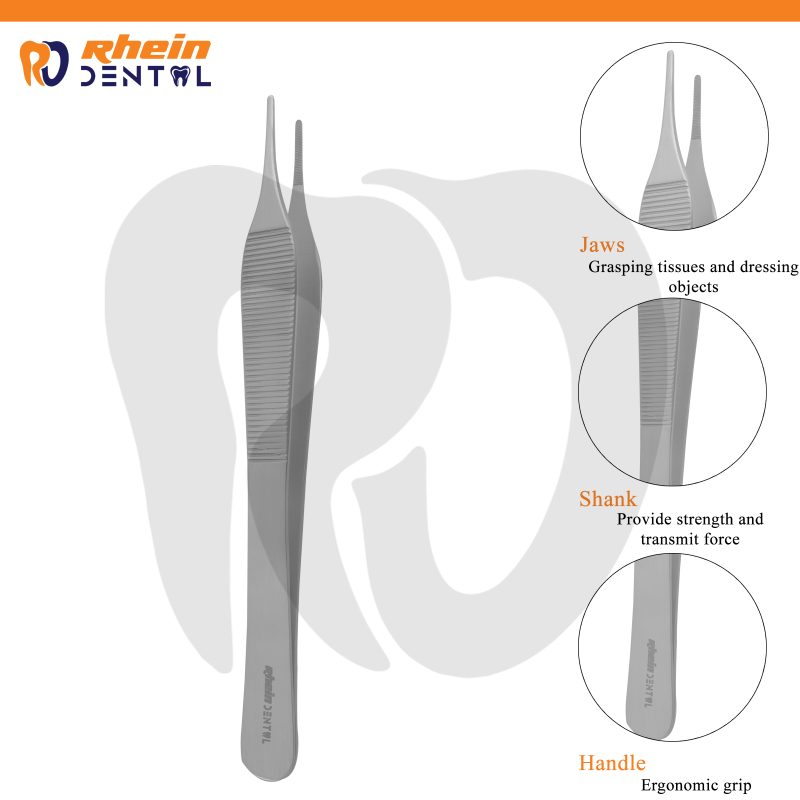
Key Features of an Archwire Director Tool
A high-quality orthodontic archwire instrument typically includes:
Fine Precision Tip
Designed to accurately guide wires into bracket slots.
Slim Working End
Improves visibility in crowded intraoral spaces.
Ergonomic Handle
Provides superior grip and reduces hand fatigue during long procedures.
Stainless Steel Construction
Offers durability, corrosion resistance, and compatibility with repeated sterilization.
Lightweight Design
Improves tactile control during delicate orthodontic adjustments.
When Is an Archwire Director Used?
The archwire director is useful throughout orthodontic treatment.
Common clinical applications include:
During Initial Archwire Placement
Helping seat flexible NiTi wires into bracket slots.
Wire Repositioning
Correcting wire displacement after insertion.
During Ligation
Holding the wire securely while ligatures are applied.
Self-Ligating Bracket Procedures
Directing wires into passive or active bracket clips.
Finishing Procedures
Making small wire adjustments before completing treatment.
Step-by-Step Guide: How to Use an Archwire Director Properly
Following the correct technique improves efficiency while protecting orthodontic appliances.
Step 1: Inspect the Instrument
Before treatment:
- Ensure the tip is undamaged.
- Verify proper sterilization.
- Confirm smooth working surfaces.
A damaged instrument can scratch or deform the archwire.
Step 2: Position the Patient Comfortably
Ensure:
- Adequate lighting
- Clear visibility
- Proper cheek retraction
- Dry working field
Good visualization significantly improves precision.
Step 3: Insert the Archwire
Place the archwire loosely through the brackets before using the archwire director tool.
Avoid forcing the wire.
Step 4: Guide the Wire into the Bracket Slot
Using the precision tip:
- Apply gentle pressure.
- Direct the wire into the bracket slot.
- Avoid twisting or bending the wire.
- Work one bracket at a time.
This minimizes stress on the appliance.
Step 5: Secure the Wire
Once seated:
- Apply elastic ligatures
- Close self-ligating clips
- Confirm complete wire engagement
The archwire should sit fully inside every bracket slot.
Step 6: Verify Alignment
Inspect the full dental arch.
Check for:
- Proper seating
- Symmetrical positioning
- No wire distortion
- Stable bracket engagement
Make final adjustments if necessary.
Clinical Tips for Better Wire Positioning
Experienced orthodontists recommend:
- Use controlled finger pressure rather than excessive force.
- Work slowly around crowded teeth.
- Keep the instrument perpendicular to the bracket whenever possible.
- Support the wire during insertion.
- Verify every bracket before moving to the next tooth.
These habits improve efficiency and reduce appliance damage.
Common Mistakes to Avoid
Even experienced clinicians occasionally make errors.
Applying Too Much Force
Excessive pressure may:
- Distort wires
- Damage brackets
- Increase patient discomfort
Using the Wrong Instrument
Many clinicians mistakenly substitute:
- Explorers
- Scalers
- Cotton pliers
These instruments lack the precision of a dedicated archwire director.
Skipping Final Inspection
Always verify:
- Complete wire seating
- Proper ligation
- Stable appliance engagement
Minor positioning errors can compromise treatment.
Working Without Adequate Visibility
Poor lighting increases the risk of:
- Missed bracket slots
- Wire bending
- Soft tissue injury
Benefits of Using an Archwire Director Tool
Using a dedicated archwire director tool offers numerous clinical advantages.
Improved Precision
Designed specifically for controlled orthodontic wire placement.
Enhanced Patient Comfort
Gentle wire guidance reduces unnecessary pressure.
Faster Appointments
Efficient wire seating shortens chair time.
Reduced Appliance Damage
Less risk of deforming wires or brackets.
Better Treatment Outcomes
Accurate wire positioning supports predictable tooth movement.
Archwire Director vs Orthodontic Pliers
Although both instruments assist with orthodontic procedures, they serve different purposes.
| Feature | Archwire Director Tool | Orthodontic Pliers |
|---|---|---|
| Primary Function | Wire guidance | Wire gripping and bending |
| Pressure Applied | Gentle pushing | Firm gripping |
| Precision | Very high | Moderate |
| Risk of Wire Damage | Low | Higher if misused |
| Ideal For | Seating wires | Cutting, bending, holding |
Many orthodontists use both instruments together for efficient wire management.
Maintenance and Sterilization
Proper instrument care extends service life.
Cleaning
- Remove debris immediately after use.
- Use enzymatic cleaners if needed.
- Rinse thoroughly.
Sterilization
Most stainless-steel orthodontic instruments are suitable for steam autoclaving according to the manufacturer’s instructions.
Inspection
Regularly examine:
- Tip alignment
- Surface wear
- Corrosion
- Handle integrity
Replace damaged instruments promptly.
Choosing a High-Quality Archwire Director Tool
When purchasing an orthodontic wire positioning instrument, consider:
- Medical-grade stainless steel
- Precision-machined tip
- Comfortable ergonomic handle
- Satin or matte finish to reduce glare
- Reliable corrosion resistance
- Reputable manufacturer
- Compliance with relevant quality standards
Investing in quality instruments improves both clinical efficiency and longevity.
Conclusion
The archwire director tool is an indispensable instrument in modern orthodontics, enabling clinicians to position archwires with precision, efficiency, and minimal patient discomfort. By mastering proper technique, maintaining the instrument correctly, and using it alongside other essential orthodontic tools, practitioners can improve workflow, protect orthodontic appliances, and achieve more predictable treatment outcomes.
Whether you’re outfitting a new orthodontic practice or refining your clinical skills, investing in a high-quality archwire director and following best practices for its use will contribute to safer procedures and consistently successful orthodontic care.
Frequently Asked Questions (FAQs)
What is an archwire director tool used for?
An archwire director tool is used to guide, position, and seat orthodontic archwires accurately into bracket slots during orthodontic treatment.
Can an archwire director replace orthodontic pliers?
No. The two instruments serve different functions. An archwire director is designed for wire positioning, while orthodontic pliers are used for gripping, bending, and cutting wires.
Is an archwire director suitable for self-ligating brackets?
Yes. It is commonly used to guide archwires into self-ligating bracket slots before the clips are closed.
Does using an archwire director improve patient comfort?
Yes. Proper wire guidance minimizes unnecessary force, reducing discomfort and helping prevent soft tissue irritation.
How often should an archwire director be replaced?
Replace the instrument if the working tip becomes bent, worn, damaged, or corroded, or if it no longer provides accurate wire control despite proper maintenance.