
Proper sterilization is one of the most important aspects of every orthodontic practice. Every instrument that comes into contact with a patient’s oral cavity has the potential to transmit harmful microorganisms if not cleaned and sterilized correctly. Following autoclave best practices for orthodontists helps eliminate bacteria, viruses, fungi, and spores while extending the lifespan of valuable orthodontic instruments.
Whether you’re sterilizing orthodontic pliers, ligature cutters, distal end cutters, bracket positioning tweezers, band removers, or mirror handles, using the correct autoclave procedure ensures patient safety, regulatory compliance, and long-term instrument performance.
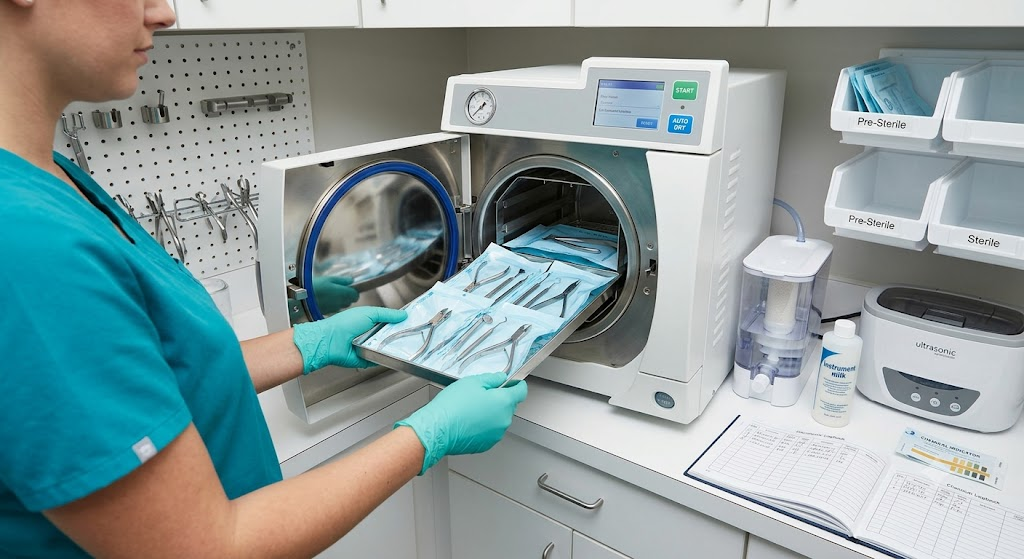
This comprehensive guide explains everything orthodontists, dental assistants, and sterilization technicians need to know about sterilizing orthodontic instruments the right way.
Why Proper Sterilization Matters in Orthodontics
Unlike disposable items, orthodontic instruments are repeatedly used throughout the day. Because they come into direct contact with saliva and occasionally blood, they must be thoroughly decontaminated between patients.
Proper sterilization helps:
- Prevent cross-contamination
- Eliminate bacteria and viruses
- Meet infection control standards
- Protect patients and staff
- Increase instrument longevity
- Reduce costly instrument replacement
- Maintain professional clinical standards
Infection prevention is not simply a recommendation—it is a core component of quality orthodontic care.
What Is an Autoclave?
An autoclave is a medical sterilization device that uses pressurized saturated steam to destroy microorganisms.
Unlike chemical disinfectants, an autoclave eliminates:
- Bacteria
- Viruses
- Fungi
- Bacterial spores
- Antibiotic-resistant microorganisms
Steam sterilization is considered the gold standard for reusable orthodontic instruments.
How Does Steam Sterilization Work?
Steam under pressure transfers heat efficiently to every instrument surface.
The sterilization process generally follows these stages:
- Air removal
- Steam injection
- Exposure period
- Pressure release
- Drying cycle
The drying cycle is equally important because moisture left on instruments encourages corrosion and contamination.
Orthodontic Instruments That Require Autoclaving
Most reusable orthodontic instruments should be steam sterilized after every patient.
Common examples include:
- Orthodontic pliers
- Bird beak pliers
- Weingart pliers
- Distal end cutters
- Ligature cutting pliers
- Bracket removing pliers
- Band removing pliers
- Bracket positioning tweezers
- Mathieu pliers
- Utility pliers
- Mosquito forceps
- Dental mirrors
- Explorers
- Periodontal probes
- Bracket gauges
- Bite sticks
- Instrument trays
Always verify manufacturer instructions before sterilization.
Step-by-Step Guide to Sterilizing Orthodontic Instruments
Step 1: Remove Debris Immediately After Use
Cleaning should begin immediately after treatment.
Dried blood, adhesive, cement, and saliva become harder to remove over time.
Recommended methods include:
- Rinsing under running water
- Using enzymatic cleaners
- Keeping instruments moist until cleaning
Never allow contaminated instruments to dry completely.
Step 2: Thorough Instrument Cleaning
Cleaning removes organic material before sterilization.
Methods include:
Ultrasonic Cleaner
An ultrasonic cleaner removes debris from:
- Hinges
- Serrations
- Box joints
- Fine instrument tips
This is one of the safest methods for orthodontic instruments.
Manual Cleaning
If manual cleaning is necessary:
- Wear PPE
- Use a soft nylon brush
- Avoid abrasive pads
- Never use steel wool
Scratches can lead to corrosion and bacterial buildup.
Step 3: Inspect Every Instrument
Before packaging:
Check for:
- Rust
- Cracks
- Loose joints
- Bent tips
- Damaged cutting edges
- Worn hinges
Damaged instruments should be repaired or replaced before reuse.
Step 4: Lubricate Hinged Instruments
Use only steam-penetrable instrument lubricants (instrument milk).
Lubrication:
- Prevents stiffness
- Reduces friction
- Protects box joints
- Extends instrument life
Avoid oil-based household lubricants.
Step 5: Package Instruments Properly
Correct packaging maintains sterility after autoclaving.
Use:
- Sterilization pouches
- Sterilization wraps
- Instrument cassettes
Each package should include:
- Sterilization indicator
- Date
- Cycle number
- Operator initials (if required)
Avoid overpacking pouches.
Steam must circulate freely.
Best Autoclave Settings for Orthodontic Instruments
Although manufacturer recommendations should always be followed, common steam sterilization settings include:
| Cycle Type | Temperature | Pressure | Time |
|---|---|---|---|
| Gravity Displacement | 121°C (250°F) | 15 psi | 30 minutes |
| Pre-Vacuum | 132–134°C (270–273°F) | 27–30 psi | 4–7 minutes |
Modern dental clinics commonly use Class B vacuum autoclaves, which provide excellent steam penetration for wrapped and hollow instruments.
Correct Autoclave Loading Practices
Improper loading reduces sterilization effectiveness.
Best practices include:
- Place pouches paper side up when recommended.
- Avoid stacking heavy instrument packs.
- Leave space between packages.
- Position hinged instruments open.
- Do not overload trays.
- Ensure steam circulation throughout the chamber.
Proper loading significantly improves sterilization consistency.
Drying Is Just as Important
One of the biggest mistakes is removing instruments before the drying cycle finishes.
Wet packages:
- Lose sterility
- Attract bacteria
- Increase corrosion risk
Always allow instruments to cool and dry completely before handling.
Monitoring Sterilization Effectiveness
Sterilization should be verified routinely using three types of monitoring.
1. Mechanical Monitoring
Check:
- Temperature
- Pressure
- Exposure time
Every sterilization cycle should be documented.
2. Chemical Indicators
Chemical indicators change color after exposure to proper sterilization conditions.
Use:
- Internal indicators
- External indicator tape
- Class 5 integrating indicators
3. Biological Indicators
Biological spore testing provides the highest level of sterilization assurance.
Most practices perform routine biological monitoring according to local regulations and manufacturer recommendations.
Common Sterilization Mistakes to Avoid
Many orthodontic practices unintentionally shorten instrument life.
Avoid these mistakes:
- Skipping pre-cleaning
- Overloading the autoclave
- Closing hinged instruments
- Mixing stainless steel with carbon steel improperly
- Using incorrect sterilization temperatures
- Removing wet packs too early
- Ignoring maintenance schedules
- Using damaged sterilization pouches
- Not replacing worn cutting instruments
- Failing to document sterilization cycles
Preventing Rust and Corrosion
Rust is one of the leading causes of premature instrument failure.
To reduce corrosion:
- Dry instruments completely
- Use distilled or demineralized water if recommended for your autoclave.
- Remove chemical residues after cleaning.
- Lubricate moving joints.
- Store instruments in dry environments.
- Avoid harsh chemicals containing chloride.
- Follow manufacturer cleaning instructions.
High-quality surgical stainless steel instruments last significantly longer with proper care.
How Often Should an Autoclave Be Maintained?
Routine maintenance keeps sterilization reliable.
Maintenance includes:
- Cleaning chamber walls
- Inspecting door seals
- Replacing filters
- Cleaning water reservoirs
- Checking pressure valves
- Running validation tests
Follow the manufacturer’s maintenance schedule for optimal performance.
Storage After Sterilization
Sterile instruments should be stored:
- In closed cabinets
- Away from moisture
- Away from direct sunlight
- In clean, dust-free environments
Inspect packaging before use.
If packaging becomes damaged or wet, reprocess the instruments.
Benefits of Following Autoclave Best Practices
Proper sterilization provides numerous clinical and operational benefits.
Advantages include:
- Improved patient safety
- Lower infection risk
- Better compliance with infection control standards
- Longer instrument lifespan
- Reduced repair costs
- Consistent cutting performance
- Better orthodontic treatment efficiency
- Increased patient confidence
- Improved practice reputation
Final Thoughts
Consistent adherence to autoclave best practices for orthodontists is essential for maintaining a safe, efficient, and compliant clinical environment. Proper cleaning, inspection, lubrication, packaging, steam sterilization, drying, and storage all play a critical role in protecting both patients and orthodontic instruments.
By following validated sterilization protocols and maintaining your autoclave regularly, your practice can reduce the risk of cross-contamination, preserve the precision of orthodontic tools, and ensure long-lasting performance. Investing time in proper sterilization today helps safeguard patient health, supports regulatory compliance, and protects your instrument investment for years to come.
Frequently Asked Questions
Can orthodontic pliers be autoclaved?
Yes. Most stainless steel orthodontic pliers are designed for repeated steam sterilization. Always follow the manufacturer’s recommendations.
Should orthodontic instruments be lubricated before autoclaving?
Yes. Hinged instruments benefit from steam-compatible instrument lubricants applied after cleaning and before sterilization.
Why do orthodontic instruments rust after autoclaving?
Common causes include inadequate drying, poor water quality, chemical residue, damaged passivation layers, and improper maintenance.
Can ultrasonic cleaning replace autoclaving?
No. Ultrasonic cleaning removes debris but does not sterilize instruments. Steam sterilization is still required.
How often should biological spore testing be performed?
Frequency depends on local regulations and practice protocols, but routine biological monitoring is recommended to verify sterilization effectiveness.