
Maintaining clean and properly sterilized orthodontic tools is one of the most important responsibilities in every orthodontic practice. Instruments such as Weingart pliers, Bird Beak pliers, Distal End Cutters, Ligature Cutters, Bracket Positioning Tweezers, Mathieu Needle Holders, Band Removing Pliers, and Bite Sticks come into direct contact with saliva, blood, and oral tissues during treatment. Therefore, they must undergo a thorough cleaning and sterilization process after every patient (Orthodontic Instrument Sterilization).
Moreover, effective infection control protects patients, dental professionals, and support staff from harmful microorganisms. In addition, following a standardized sterilization protocol helps clinics comply with regulatory guidelines while extending the lifespan of valuable orthodontic instruments. As a result, practices can deliver safer, more reliable, and more efficient patient care (Orthodontic Instrument Sterilization).
Why Proper Sterilization Matters
Proper sterilization is much more than a regulatory requirement. Instead, it forms the foundation of safe orthodontic treatment and demonstrates a commitment to high clinical standards.
Some of the key benefits include:
- Preventing cross-contamination between patients
- Eliminating bacteria, viruses, fungi, and spores
- Protecting dentists, orthodontists, and dental assistants
- Preserving the precision of orthodontic instruments
- Extending instrument lifespan
- Reducing corrosion and unnecessary replacement costs
- Improving patient confidence
- Supporting compliance with infection control protocols
Cleaning vs Sterilization: Understanding the Difference
Many dental professionals use the terms interchangeably. However, cleaning and sterilization are two completely different processes, and each plays an essential role.
Cleaning
Cleaning removes:
- Blood
- Saliva
- Tissue debris
- Dental cement
- Adhesive residue
- Organic contaminants
Without effective cleaning, sterilization cannot fully reach contaminated surfaces.
Sterilization
Sterilization destroys:
- Bacteria
- Viruses
- Fungi
- Bacterial spores
- Other disease-causing microorganisms
Consequently, both cleaning and sterilization must always be performed together.
Orthodontic Instruments That Require Sterilization
Every reusable instrument that enters the patient’s mouth should be sterilized before it is used again.
These commonly include:
- Bird Beak Pliers
- Weingart Pliers
- Distal End Cutters
- Ligature Cutting Pliers
- Utility Pliers
- Bracket Positioning Tweezers
- Bracket Holders
- Mathieu Needle Holders
- Ligature Directors
- Bite Sticks
- Band Removing Pliers
- Archwire Instruments
- Band Seating Instruments
Step 1: Handle Instruments Immediately After Treatment
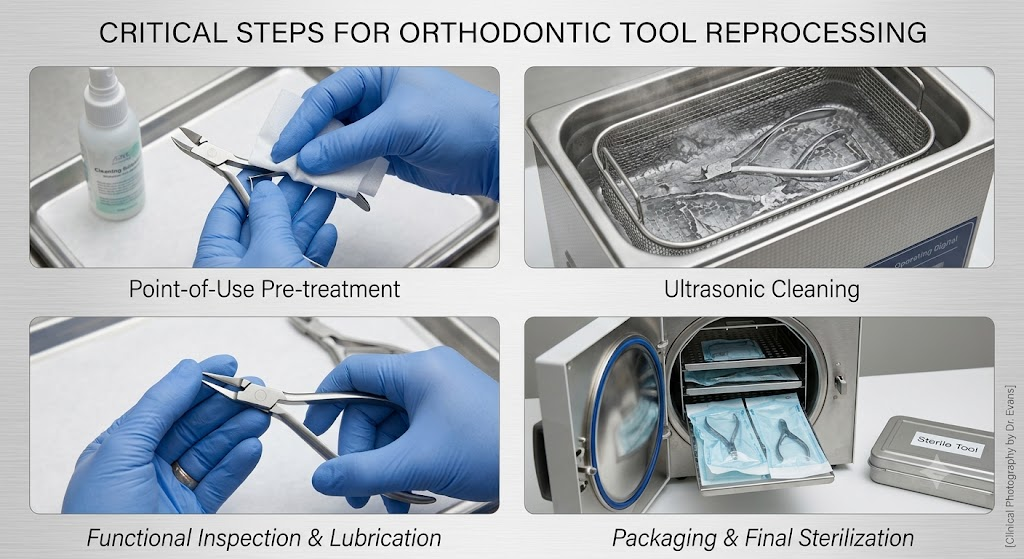
Immediately after the procedure, remove visible debris with sterile gauze.
Next, place contaminated instruments into a designated transport tray before taking them to the decontamination area.
This simple step helps prevent dried blood and adhesive from hardening, making cleaning significantly easier.
Never leave contaminated instruments exposed on work surfaces.
Step 2: Pre-Soak Instruments
If cleaning cannot begin straight away, place the instruments in an enzymatic cleaning solution.
Doing so offers several advantages:
- Loosens dried blood
- Softens adhesive residue
- Prevents staining
- Reduces manual scrubbing
- Improves ultrasonic cleaning performance
However, avoid soaking instruments longer than the manufacturer’s recommended time.
Step 3: Clean the Instruments Thoroughly
Manual cleaning is still necessary for certain orthodontic tools.
Use:
- A soft nylon brush
- Neutral-pH detergent
- Warm water
- Protective gloves
- Eye protection
While cleaning, pay close attention to:
- Hinges
- Serrated jaws
- Box joints
- Grooves
- Cutting edges
Instead of using steel brushes or abrasive pads, choose soft cleaning materials that protect the stainless steel finish.
Step 4: Use an Ultrasonic Cleaner
Ultrasonic cleaning provides one of the most effective methods for removing microscopic debris from orthodontic instruments.
Unlike manual scrubbing alone, ultrasonic cleaners reach difficult areas that are otherwise hard to clean.
For the best results:
- Open hinged instruments
- Space instruments correctly
- Replace cleaning solution regularly
- Follow the recommended cycle time (typically 5–15 minutes)
Afterward, proceed immediately to rinsing.
Step 5: Rinse and Dry Completely
Rinse every instrument thoroughly with clean or distilled water.
Then, dry each instrument using compressed air or a lint-free cloth.
If moisture remains, corrosion and staining may develop over time. Therefore, complete drying should never be skipped.
Step 6: Inspect Every Instrument Carefully
Before packaging, inspect every instrument carefully.
Check for:
- Rust
- Cracks
- Loose joints
- Bent tips
- Misaligned jaws
- Worn cutting edges
- Surface corrosion
If any damage is detected, remove the instrument from clinical use immediately.
Step 7: Lubricate Hinged Instruments
Many orthodontic pliers contain hinges that require routine lubrication.
For this reason, use instrument milk or a lubricant specifically designed for surgical instruments.
Regular lubrication:
- Improves movement
- Reduces friction
- Minimizes corrosion
- Extends instrument lifespan
Step 8: Package Instruments Correctly
Once the instruments are dry and inspected, package them properly before sterilization.
Suitable packaging options include:
- Sterilization pouches
- Instrument cassettes
- Sterilization wraps
Each package should include:
- Sterilization date
- Batch number
- Operator identification
- Chemical indicator
Additionally, avoid overcrowding sterilization pouches because steam must circulate freely.
Step 9: Sterilize Using an Autoclave
Steam sterilization remains the gold standard for reusable orthodontic instruments.
Common sterilization cycles include:
- 121°C for 30 minutes
- 134°C for 3–5 minutes (depending on the sterilizer)
Nevertheless, always follow both the instrument manufacturer’s instructions and your autoclave manufacturer’s guidelines.
Likewise, avoid overloading the chamber, as this can reduce sterilization effectiveness.
Step 10: Store Sterilized Instruments Properly
Following sterilization, store instruments in a clean, dry environment.
Recommended storage practices include:
- Keeping instruments inside sealed pouches
- Protecting them from moisture
- Storing them away from direct sunlight
- Organizing them by procedure or instrument type
Before every procedure, inspect the packaging.
If a pouch becomes damaged or wet, the instrument must be reprocessed before use.
Best Practices for Orthodontic Instrument Maintenance
Proper maintenance helps preserve precision and minimizes costly replacements.
Follow these recommendations:
- Sterilize after every patient
- Inspect instruments after each cycle
- Lubricate hinged instruments regularly
- Sharpen cutting instruments when required
- Replace damaged instruments promptly
- Use distilled water where recommended
- Follow manufacturer maintenance instructions
- Handle instruments carefully to prevent accidental damage
Overall, consistent maintenance significantly improves instrument longevity.
Common Sterilization Mistakes to Avoid
Even experienced professionals can make mistakes.
Avoid the following:
- Skipping the cleaning stage
- Overloading the autoclave
- Failing to dry instruments completely
- Ignoring routine inspections
- Using damaged sterilization pouches
- Mixing incompatible metals
- Using abrasive cleaning tools
- Neglecting sterilization monitoring
Ultimately, avoiding these errors helps maintain both patient safety and instrument quality.
Infection Control Standards
Every orthodontic practice should establish clear sterilization protocols.
These protocols should include:
- Biological monitoring
- Chemical indicators
- Instrument tracking
- Staff training
- Equipment maintenance
- Sterilization documentation
Furthermore, routine audits help ensure that infection control procedures remain effective and compliant.
How Often Should Orthodontic Instruments Be Sterilized?
Reusable orthodontic instruments should always be cleaned and sterilized after every patient.
Likewise, each instrument should be inspected before being packaged for the next sterilization cycle.
Above all, instruments that contact oral tissues should never be reused without complete reprocessing.
Tips for Extending Instrument Life
High-quality orthodontic instruments represent a significant investment.
Fortunately, proper care can maximize their lifespan.
To protect your instruments:
- Clean them immediately after use.
- Lubricate moving parts regularly.
- Avoid bleach-based chemicals.
- Prevent instruments from being dropped.
- Store them in dry conditions.
- Replace worn cutting edges promptly.
- Follow manufacturer recommendations.
- Schedule routine maintenance inspections.
As a result, your instruments will maintain their precision and performance for many years.
Conclusion
Proper cleaning and sterilization of orthodontic tools require more than simply placing instruments in an autoclave. Instead, the process begins immediately after treatment and continues through cleaning, ultrasonic processing, inspection, lubrication, packaging, sterilization, and proper storage.
By following a standardized infection control protocol, orthodontic professionals can protect patients, maintain regulatory compliance, and preserve the performance of their instruments. Ultimately, investing time in proper instrument care reduces replacement costs, improves clinical efficiency, and supports the highest standards of patient care.
Frequently Asked Questions
Can orthodontic pliers be autoclaved?
Yes. Most stainless steel orthodontic pliers are designed for repeated steam sterilization. However, always follow the manufacturer’s instructions.
Is ultrasonic cleaning enough?
No. Ultrasonic cleaning removes debris, but it does not sterilize instruments. Therefore, autoclaving is still essential.
Why is lubrication important?
Lubrication reduces friction, protects moving parts, minimizes corrosion, and extends instrument life.
Should rusted instruments be reused?
No. Rusted or corroded instruments should be removed from service immediately because they may compromise both patient safety and treatment quality.
Why should instruments be dried before sterilization?
Proper drying helps prevent corrosion and staining. Additionally, dry instruments perform better during sterilization and last longer.