
Molar bands remain an essential component of modern orthodontic treatment, especially for patients requiring fixed appliances, space maintainers, palatal expanders, or complex anchorage systems. While accurate band selection is critical, proper seating and adjustment are equally important for achieving long-term treatment success.
One of the most reliable instruments for this procedure is the band pusher for braces. Designed to apply controlled pressure during band placement, a band pusher enables orthodontists to seat molar bands precisely while improving patient comfort and reducing chair time.
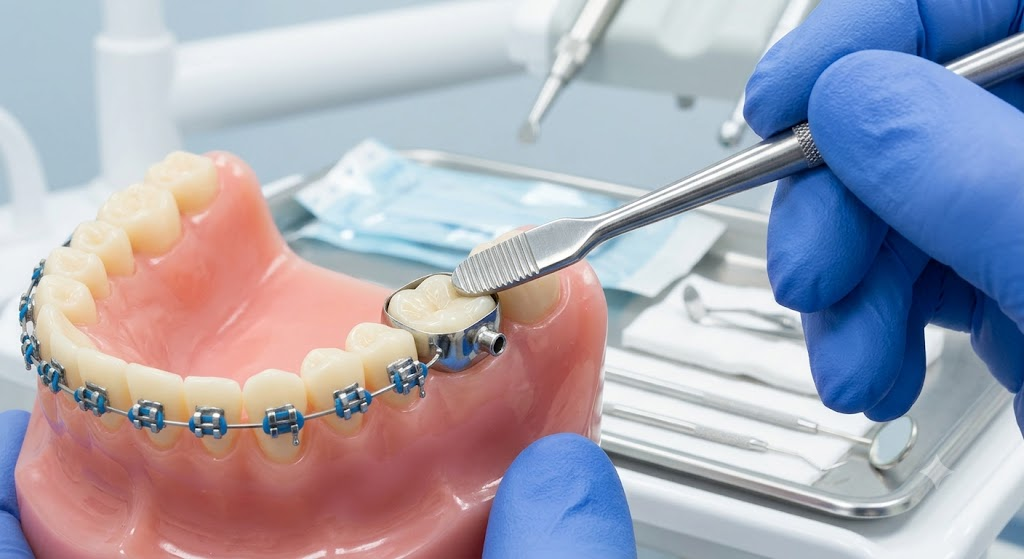
This comprehensive guide explains everything clinicians need to know about adjusting molar bands using orthodontic band pushers, including clinical techniques, indications, best practices, common mistakes, and how to choose the right instrument.
What Is a Band Pusher?
A band pusher is a handheld orthodontic instrument specifically designed to assist with seating and adjusting molar bands onto teeth during orthodontic treatment.
Unlike fingers or forceps, which may provide uneven pressure, a band pusher delivers controlled force directly over the occlusal surface, allowing clinicians to seat the band evenly without distortion.
Band pushers are commonly manufactured from medical-grade stainless steel and are designed for repeated sterilization in autoclaves.
Primary Functions
- Seating orthodontic molar bands
- Adjusting partially seated bands
- Applying controlled occlusal pressure
- Improving band adaptation
- Minimizing patient discomfort
- Increasing placement accuracy
What Are Molar Bands?
Molar bands are stainless steel rings cemented around molars rather than bonded directly to enamel.
They provide stronger retention than brackets in situations requiring higher mechanical forces.
Common Applications
- Fixed orthodontic appliances
- Palatal expanders
- Lingual arches
- Herbst appliances
- Space maintainers
- Headgear tubes
- Rapid maxillary expanders (RME)
Proper band seating is essential because even minor discrepancies can compromise appliance stability.
Why Proper Band Adjustment Matters
Poorly seated molar bands can lead to:
- Cement washout
- Food impaction
- Gingival irritation
- Decalcification
- Appliance failure
- Patient discomfort
- Band loosening
- Increased emergency appointments
Using a dedicated band pusher for braces significantly improves adaptation while reducing these risks.
Types of Orthodontic Band Pushers
Several styles are available depending on clinician preference.
1. Straight Band Pusher
Ideal for routine posterior band seating.
Best for:
- Upper molars
- Lower molars
- General orthodontic cases
2. Angled Band Pusher
Provides better visibility and access.
Suitable for:
- Limited mouth opening
- Difficult posterior access
- Pediatric patients
3. Double-Ended Band Pusher
Features two working ends for different clinical situations.
Advantages include:
- Greater versatility
- Reduced instrument changes
- Improved workflow efficiency
4. Ergonomic Handle Band Pushers
Designed for enhanced grip and reduced hand fatigue during multiple procedures.
Instruments Used Alongside Band Pushers
Band pushers are typically used with:
- Band seaters
- Band removers
- Orthodontic band contouring pliers
- Bite sticks
- Band forming pliers
- Cement spatulas
- Orthodontic mirrors
- Cotton pliers
- Air-water syringe
Together, these instruments create an efficient band placement workflow.
Step-by-Step Guide: How to Adjust Molar Bands Using Band Pushers
Step 1: Select the Correct Band Size
Choose the smallest band that fits securely around the molar.
The band should:
- Seat passively
- Resist rotation
- Cover the correct height
- Adapt closely to tooth anatomy
Never force an undersized band.
Step 2: Try-In the Band
Place the band gently over the molar using finger pressure or band-seating pliers.
Confirm:
- Proper orientation
- Buccal tube alignment
- Correct fit
- Gingival adaptation
Step 3: Position the Band Pusher
Place the working tip directly over the occlusal surface of the band.
Maintain:
- Stable wrist position
- Controlled downward pressure
- Balanced finger support
Avoid applying pressure to the buccal tube.
Step 4: Apply Controlled Pressure
Using slow, steady force, seat the band until it reaches its final position.
Pressure should be:
- Firm
- Even
- Controlled
- Continuous
Do not use excessive force.
Step 5: Verify Complete Seating
Inspect the band from multiple angles.
Check for:
- Full gingival adaptation
- Even margins
- No rocking
- Proper tube orientation
- No visible gaps
Step 6: Confirm Occlusion
Ask the patient to bite gently.
Evaluate:
- Band stability
- Patient comfort
- Occlusal interference
- Proper seating
Step 7: Cement the Band
Once satisfied with positioning:
- Isolate the tooth
- Dry thoroughly
- Apply orthodontic band cement
- Seat using the band pusher
- Remove excess cement
- Verify final adaptation
Clinical Tips for Better Band Seating
Experienced orthodontists often recommend:
Apply Pressure Gradually
Sudden force can distort the band.
Support the Opposite Arch
Finger support increases stability while reducing patient discomfort.
Keep the Instrument Perpendicular
Maintaining the correct angle ensures even seating.
Use Multiple Small Pushes
Several controlled pushes are safer than one large forceful movement.
Confirm Before Cementing
Minor adjustments are easier before cement placement.
Common Mistakes When Using Band Pushers
Applying Excessive Force
May cause:
- Band distortion
- Patient pain
- Enamel stress
Using Incorrect Band Size
A pusher cannot compensate for an improperly selected band.
Pushing on the Buccal Tube
This may:
- Damage solder joints
- Distort attachments
- Affect appliance positioning
Always push on the occlusal surface.
Ignoring Soft Tissue
Bands seated too deeply may traumatize gingival tissues.
Skipping Final Inspection
Always verify adaptation before cementation.
Benefits of Using Band Pushers for Braces
Improved Precision
Controlled pressure produces consistent seating.
Better Patient Comfort
Gradual force minimizes discomfort during placement.
Reduced Chair Time
Efficient seating shortens appointments.
Lower Risk of Band Failure
Proper adaptation improves cement retention.
Enhanced Clinical Outcomes
Accurate band placement contributes to:
- Better appliance stability
- Improved biomechanics
- Fewer emergency visits
Infection Control and Sterilization
Band pushers are reusable surgical-grade instruments.
Follow standard sterilization protocols:
- Clean immediately after use
- Ultrasonic cleaning when appropriate
- Rinse thoroughly
- Dry completely
- Package correctly
- Autoclave according to manufacturer recommendations
- Inspect regularly for wear or corrosion
Routine maintenance helps ensure long service life and consistent performance.
How to Choose the Best Band Pusher for Braces
When selecting a band pusher, consider:
Material
Choose premium surgical stainless steel for durability and corrosion resistance.
Ergonomic Design
A comfortable handle reduces clinician fatigue during extended procedures.
Precision Manufacturing
Smooth, accurately finished tips improve control and reduce the risk of damaging orthodontic bands.
Sterilization Compatibility
Ensure the instrument is fully autoclavable and designed for repeated sterilization cycles.
Build Quality
Look for:
- Seamless joints
- Polished finish
- Balanced weight
- Non-slip grip
- Long-lasting performance
Why High-Quality Orthodontic Instruments Matter
Reliable orthodontic instruments contribute to:
- More predictable treatments
- Greater procedural efficiency
- Enhanced patient safety
- Reduced maintenance costs
- Improved clinician confidence
Investing in precision-engineered band pushers for braces supports consistent clinical outcomes and long-term practice efficiency.
Frequently Asked Questions
What is a band pusher used for in orthodontics?
A band pusher is used to apply controlled pressure when seating and adjusting orthodontic molar bands, ensuring accurate adaptation and secure placement.
Can a band pusher replace a bite stick?
No. While both instruments assist in seating molar bands, they serve different purposes. A band pusher offers precise manual control, whereas a bite stick uses the patient’s bite force to help seat the band.
Are band pushers reusable?
Yes. Most high-quality band pushers are manufactured from surgical-grade stainless steel and are designed for repeated cleaning and autoclave sterilization.
How do I prevent band distortion during placement?
Use the correct band size, apply slow and even pressure with the band pusher, and avoid pushing directly on attachments such as buccal tubes.
Which type of band pusher is best?
The best option depends on clinical preference. Straight, angled, and double-ended band pushers all provide excellent performance when manufactured to high standards and used correctly.
Conclusion
Successful orthodontic treatment begins with precise appliance placement, and correctly seated molar bands are fundamental to long-term stability. Band pushers for braces provide the controlled force needed to adjust and seat molar bands accurately while minimizing patient discomfort and reducing the risk of band failure.
By selecting the correct band size, following a systematic seating technique, and using a high-quality orthodontic band pusher, clinicians can improve procedural efficiency, enhance patient outcomes, and reduce the likelihood of future adjustments. Whether in routine orthodontic care or complex appliance therapy, the band pusher remains an indispensable tool in every orthodontic practice. Ergonomic band pushers designed for professional orthodontic use.
Frequently Asked Questions:
A band pusher is used to apply controlled pressure when seating and adjusting orthodontic molar bands, ensuring accurate adaptation and secure placement.
No. While both instruments assist in seating molar bands, they serve different purposes. A band pusher offers precise manual control, whereas a bite stick uses the patient’s bite force to help seat the band.
Yes. Most high-quality band pushers are manufactured from surgical-grade stainless steel and are designed for repeated cleaning and autoclave sterilization.
Use the correct band size, apply slow and even pressure with the band pusher, and avoid pushing directly on attachments such as buccal tubes.
The best option depends on clinical preference. Straight, angled, and double-ended band pushers all provide excellent performance when manufactured to high standards and used correctly.