
Orthodontic treatment relies on precise wire adjustments to move teeth efficiently and comfortably. Whether placing a new archwire, trimming excess wire, or making intricate bends, cutting orthodontic wires correctly is essential for treatment success, patient safety, and appliance longevity.
Improper cutting techniques can damage instruments, distort the wire, injure soft tissues, or even compromise orthodontic biomechanics. Likewise, inaccurate wire bending may lead to inefficient tooth movement, increased treatment time, and patient discomfort.
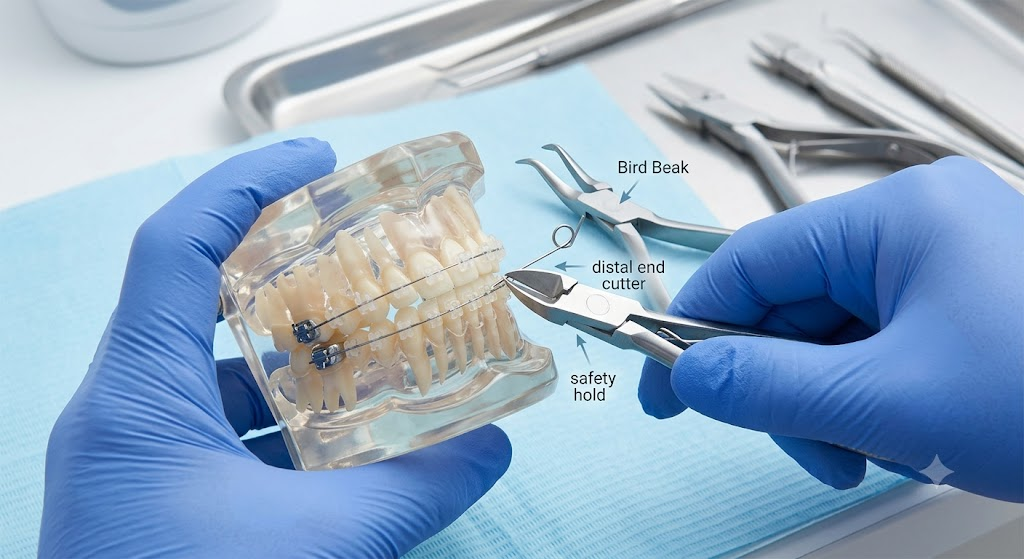
This comprehensive guide explains the safest methods for cutting and bending orthodontic wires, the instruments required, common mistakes to avoid, and best practices followed by modern orthodontic professionals.
Why Safe Orthodontic Wire Handling Matters
Orthodontic archwires generate carefully controlled forces that gradually move teeth into ideal positions. Every adjustment must preserve the wire’s intended mechanical properties.
Safe wire handling helps:
- Prevent patient injuries
- Protect cheeks, lips, and tongue
- Maintain wire integrity
- Avoid damaging orthodontic brackets
- Extend instrument lifespan
- Improve treatment efficiency
- Reduce emergency appointments
Small errors during wire adjustment can create unnecessary complications that affect both clinicians and patients.
Understanding Orthodontic Wires
Before learning proper cutting techniques, it’s important to understand the different wire materials used in orthodontics.
Nickel Titanium (NiTi)
Nickel Titanium wires are highly flexible and possess shape memory.
Common uses:
- Initial alignment
- Crowding correction
- Early treatment stages
Characteristics:
- Superelastic
- Difficult to bend permanently
- Requires high-quality cutters
Stainless Steel Wires
Stainless steel wires are rigid and highly formable.
Used for:
- Space closure
- Finishing
- Detailing
- Final treatment stages
Advantages include:
- Easy to bend
- Excellent control
- Strong and durable
Beta Titanium (TMA)
Beta Titanium combines flexibility with formability.
Benefits include:
- Moderate stiffness
- Accepts intricate bends
- Suitable for customized mechanics
Essential Instruments for Cutting Orthodontic Wires
Using the correct orthodontic pliers makes the procedure safer and more precise.
Distal End Cutter
The distal end cutter is specifically designed to trim the wire extending behind the last molar.
Features include:
- Safety hold mechanism
- Flush cutting
- Prevents wire fragments from entering the mouth
Ideal for:
- Stainless steel wires
- NiTi wires
- Finishing archwires
Ligature Cutter
Ligature cutters are designed for cutting:
- Stainless steel ligature wires
- Soft orthodontic wires
- Fine wire adjustments
They should not be used on heavy rectangular archwires.
Hard Wire Cutter
Hard wire cutters are manufactured to cut:
- Heavy stainless steel wires
- Rectangular archwires
- Thick orthodontic wires
These instruments produce clean cuts without excessive force.
Bird Beak Pliers
Bird Beak Pliers are among the most versatile orthodontic instruments.
Applications include:
- Loop formation
- Wire bending
- Hook fabrication
- Precision adjustments
Weingart Pliers
Weingart pliers assist with:
- Wire placement
- Wire removal
- Holding archwires
- Minor adjustments
Step-by-Step Guide to Cutting Orthodontic Wires Safely
Step 1: Select the Correct Cutter
Choose the cutter based on:
- Wire material
- Wire thickness
- Clinical procedure
Never use ligature cutters on heavy stainless steel wires.
Step 2: Inspect the Instrument
Before every procedure, inspect for:
- Sharp cutting edges
- Proper alignment
- Smooth hinge movement
- No visible damage
Dull cutters may crush instead of cut.
Step 3: Stabilize the Wire
Secure the wire using orthodontic pliers.
Proper stabilization:
- Prevents sudden movement
- Improves cutting accuracy
- Reduces patient discomfort
Step 4: Position the Cutter
Place the cutter:
- Perpendicular to the wire
- Close to the intended cutting point
- Without twisting
Incorrect angles increase instrument wear.
Step 5: Make One Smooth Cut
Apply firm, controlled pressure.
Avoid:
- Repeated squeezing
- Rocking motions
- Twisting the instrument
A clean single cut protects both the wire and cutter.
Step 6: Capture the Wire Segment
Distal end cutters feature a holding mechanism that captures the cut wire.
This prevents:
- Swallowing
- Aspiration
- Soft tissue injuries
Step 7: Check for Sharp Ends
After trimming:
- Inspect visually
- Run an explorer gently along the wire
- Confirm patient comfort
Sharp wire ends should always be corrected.
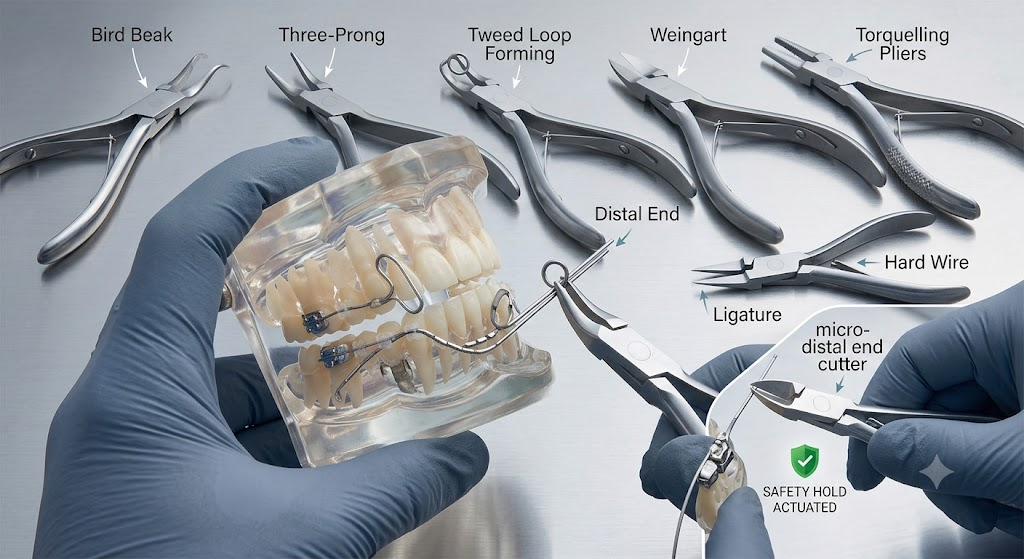
How to Bend Orthodontic Wires Safely
Wire bending requires precision rather than force.
Choose the Appropriate Pliers
Different bends require different pliers.
Common choices:
- Bird Beak Pliers
- Three-Prong Pliers
- Loop Forming Pliers
- Tweed Pliers
Understand the Planned Tooth Movement
Every bend changes force delivery.
Examples include:
- First-order bends
- Second-order bends
- Third-order torque bends
- Step bends
- Offset bends
Plan before bending.
Apply Gradual Pressure
Avoid sudden force.
Controlled bending:
- Prevents wire fracture
- Produces accurate angles
- Preserves wire properties
Avoid Repeated Bending
Repeated adjustments weaken metal.
This is particularly important with:
- Stainless steel
- Beta Titanium
Excessive manipulation increases fracture risk.
Common Orthodontic Wire Bends
Step Bend
Used to:
- Extrude teeth
- Intrude teeth
- Correct vertical discrepancies
Offset Bend
Provides:
- Better bracket engagement
- Improved alignment
Closing Loop
Common during:
- Space closure
- Controlled tooth movement
Omega Loop
Frequently used:
- At treatment completion
- For archwire stabilization
Safety Precautions During Wire Adjustment
Always:
- Wear protective eyewear
- Use high-quality cutters
- Inspect instruments regularly
- Sterilize all pliers
- Maintain good lighting
- Use cheek retractors
- Protect soft tissues
- Verify wire stability before cutting
Common Mistakes to Avoid
Using the Wrong Cutter
This may:
- Damage the instrument
- Produce rough wire ends
- Increase patient discomfort
Twisting While Cutting
Twisting causes:
- Uneven cuts
- Instrument wear
- Wire deformation
Ignoring Instrument Maintenance
Poor maintenance leads to:
- Dull blades
- Misalignment
- Reduced cutting efficiency
Over-Bending the Wire
Excessive bending changes:
- Force delivery
- Treatment accuracy
- Appliance effectiveness
Instrument Care After Cutting Orthodontic Wires
Proper maintenance improves performance and longevity.
Recommended steps include:
- Immediate cleaning
- Ultrasonic cleaning if appropriate
- Thorough rinsing
- Drying before sterilization
- Autoclaving according to manufacturer instructions
- Regular lubrication of joints
- Periodic inspection for wear
Replace cutters when blades become dull or misaligned.
Choosing High-Quality Orthodontic Wire Cutters
When selecting orthodontic instruments, consider:
- Surgical-grade stainless steel construction
- Tungsten carbide cutting inserts
- Precision alignment
- Comfortable ergonomic handles
- Corrosion resistance
- Reliable sterilization compatibility
- CE and ISO-compliant manufacturing
Premium instruments deliver cleaner cuts and longer service life.
Final Thoughts
Safe cutting orthodontic wires is a fundamental clinical skill that directly influences treatment efficiency, patient comfort, and appliance performance. Selecting the correct cutter, using precise techniques, and maintaining high-quality orthodontic instruments help ensure accurate wire adjustments while minimizing the risk of injury or instrument damage.
Whether trimming excess archwire with a distal end cutter or creating precise bends with Bird Beak Pliers, following established best practices supports predictable tooth movement and successful orthodontic outcomes. Investing in premium, well-maintained orthodontic instruments allows clinicians to perform every wire adjustment with confidence, accuracy, and safety.
Frequently Asked Questions
What is the best instrument for cutting orthodontic wires?
A distal end cutter is generally the safest option for trimming archwires because it securely captures the cut wire segment while producing a clean cut.
Can regular wire cutters be used for orthodontics?
No. Standard wire cutters are not designed for orthodontic archwires and may damage the wire, compromise precision, or create safety hazards.
Why do orthodontic wires require different cutters?
Different wire materials and diameters have varying hardness. Using the correct cutter ensures clean cuts while protecting both the instrument and the wire.
How often should orthodontic wire cutters be replaced?
Replacement depends on usage frequency, maintenance, and wire types. Regular inspection is recommended, and cutters should be replaced when they become dull, chipped, or misaligned.
Which pliers are commonly used for wire bending?
Bird Beak Pliers, Three-Prong Pliers, Tweed Pliers, and Loop Forming Pliers are among the most commonly used instruments for precise orthodontic wire bending.